I feel compelled to write this up because of the struggles I faced along the way. Nothing was terrible or difficult but some of the docs were outdated and I had to find random gists and do some code archeology.
Check out the updated article where it goes in Kubernetes
And Now, a Proper Mastodon Instance on Kubernetes.
Why are you doing this?
I’m compelled to do things the hardest way possible. As such, the simple decision to “start sharing hot takes on a platform that isn’t Twitter” turned into a mess. The result was learning a bit and isn’t that what’s really important?
No. That’s not what’s really important
So, the decision was made to deploy a Mastodon service and the deployment options needed evaluation.
1. Pay someone else
Not enough learnings.
2. Deploy it using the helm chart into my Kubernetes cluster
Too much learnings.
When I was at GitLab, one of the growing trends was trying to run GitLab in Kubernetes clusters. It was never a good idea. GitLab was a big rails monolith and stateful and async and workers. Their deployment has come a long way, but I’m still not trying to put that into my cluster until it’s mightily refactored.
3. Docker container
Seems about right. Hook it into a bunch of other stuff and it should be pretty easy to get going.
These are some of my reasons for selecting this:
- Rails app monoliths are large and do a lot of stuff in ways that expect to be interconnected
- Kubernetes storage in my cluster is kinda slow, and kinda limited
- Fail-over and load balancing aren’t a priority at this point
- The existing infra can still benefit from Kubernetes
- Use nginx ingress and external endpoints to route traffic
- Use minio on the same docker daemon
- Use cert-manager to handle TLS
- Use the overpowered CPU since most workloads were migrated to the Kubernetes cluster
Execution was necessarily comprehensive
Due to how Rails has secure defaults, it really hates being deployed in production mode without all the pieces in order. To get all the pieces in order, I did the following:
- Set public DNS up to point
mast.brownfield.devat a CNAME that will reach my servers - Set internal DNS to point to the Kubernetes cluster’s ingress load balancer
- Configure my mail provider to allow outbound SMTP (haven’t done this in years)
- Create a minio docker-compose.yml file (below)
- Added a public bucket to Minio, added new keys. Gave the new keys read write but not admin access
Minio needs to be running
Since I’m using docker compose for Mastodon, it seemed fine to use it for Minio also.
Note that I’m not using the hyphenated docker-compose since the Docker compose plugin was released.
If you’re going to host Mastodon on a cloud provider, just use S3 or B2 or whatever your cheapest object storage option is. This section is only for idiots like me who want to run your own object storage.
Make a directory somewhere with a lot of storage and some good bandwidth.
Here’s the docker-compose.yml file contents.
version: '3'
services:
  minio:
    restart: always
    image: quay.io/minio/minio:latest
    volumes:
      - ./objects:/data
    ports:
      - '9000:9000'
      - '9001:9001'
    environment:
      - 'MINIO_ROOT_USER=mterhar'
      - 'MINIO_ROOT_PASSWORD=hunter2'
      - 'MINIO_CONSOLE_URL=http://10.92.2.6:9001'
    command:
      - server
      - /data
      - --console-address
      - ":9001"
The way this is deployed, Minio proper will be exposed on 9000 and traffic will need to be routed to that port. Access to the Minio console is limited to people on the local network anyway, so we’ll just reference it by IP.
The way Mastodon uses object storage is to offload references to these files so the user’s browser pulls them directly.
For a new image to be uploaded, a user will send the file to Mastodon which will use its S3 client to deliver the file to Minio.
Once it’s in S3 (Minio in our case), the references to it are set by the S3_ALIAS_HOST environment variable.
To get this started, from the same minio directory you created earlier, run docker compose up -d.
If you want to check on the log output, use docker compose logs --follow so you can detach from the logs without killing Minio.
If you need to reconfigure something, use docker compose down.
Once you’re satisfied with your object storage, the next thing we have to do is expose the Minio service to Mastodon and the internet on files.mast.brownfield.dev.
K8s objects to expose Minio to the world
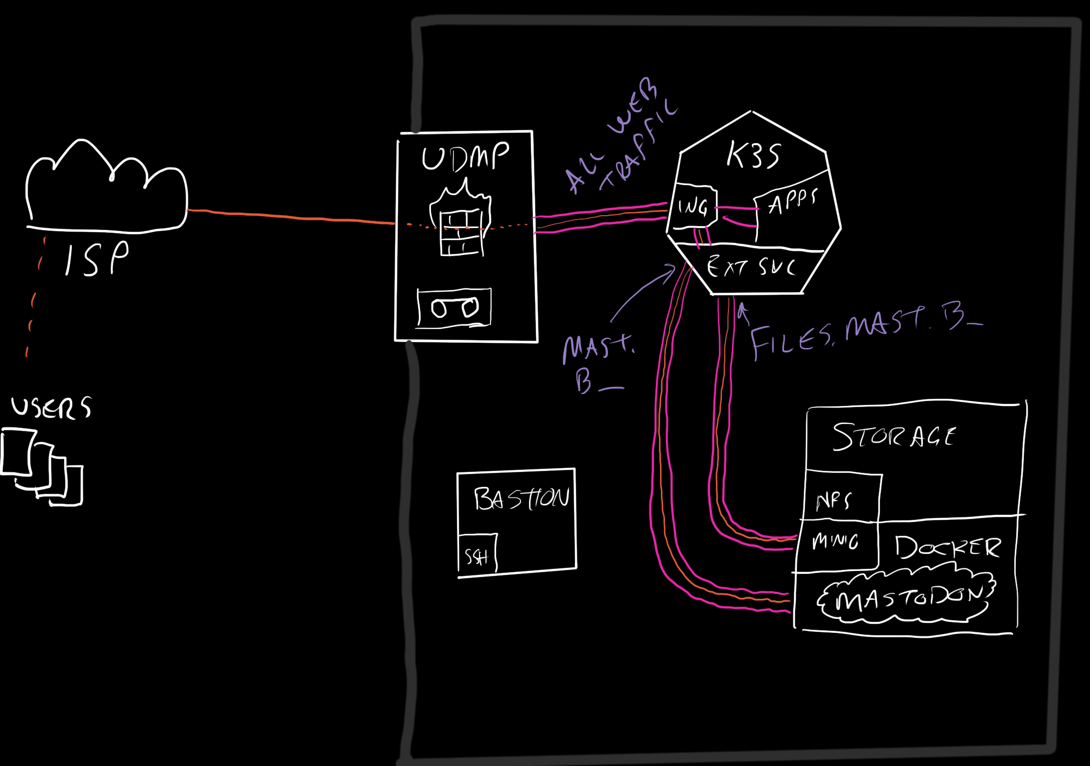
There are 3 layers to hosting an external service via a Kubernetes cluster.
This cluster uses nginx so with a reference minio nginx config, I copied the important headers into annotations for the ingress.
The other objects that need to be created are “Endpoints” and “Services”.
The endpoints are normally created by a pod and the service can reference them by name.
Since we aren’t landing traffic at a pod, the endpoint is just an IP on the network.
apiVersion: v1
kind: Service
metadata:
  name: minio-stor1
  namespace: minio
spec:
  ports:
  - name: minio-web
    port: 9000
    protocol: TCP
    targetPort: 9000
  clusterIP: None
  type: ClusterIP
---
apiVersion: v1
kind: Endpoints
metadata:
  name: minio-stor1
  namespace: minio
subsets:
- addresses:
  - ip: 10.92.2.6
  ports:
  - name: minio-web
    port: 9000
    protocol: TCP
---
apiVersion: networking.k8s.io/v1
kind: Ingress
metadata:
  name: minio-stor1
  namespace: minio
  annotations:
    cert-manager.io/cluster-issuer: "external"
    acme.cert-manager.io/http01-edit-in-place: "true"
    nginx.ingress.kubernetes.io/proxy-body-size: 20m
    nginx.org/client-max-body-size: 20m
    nginx.org/proxy-connect-timeout: 75s
    nginx.org/proxy-read-timeout: 60s
    nginx.ingress.kubernetes.io/configuration-snippet: |
      proxy_set_header X-Real-IP $remote_addr;
      proxy_set_header X-Forwarded-For $proxy_add_x_forwarded_for;
      proxy_hide_header Set-Cookie;
      proxy_hide_header 'Access-Control-Allow-Origin';
      proxy_hide_header 'Access-Control-Allow-Methods';
      proxy_hide_header 'Access-Control-Allow-Headers';
      proxy_hide_header x-amz-id-2;
      proxy_hide_header x-amz-request-id;
      proxy_hide_header x-amz-meta-server-side-encryption;
      proxy_hide_header x-amz-server-side-encryption;
      proxy_hide_header x-amz-bucket-region;
      proxy_hide_header x-amzn-requestid;
      proxy_ignore_headers Set-Cookie;
spec:
  ingressClassName: external
  rules:
  - host: files.mast.brownfield.dev
    http:
      paths:
      - backend:
          service:
            name: minio-stor1
            port:
              name: minio-web
        path: /
        pathType: Prefix
  tls:
  - hosts:
    - files.mast.brownfield.dev
    secretName: files-mast-tls-secret
I realize this is a huge block of yaml to put in one place but it kinda tells the story nicely. I’ve decided not to redact or adjust anything since the service is public and IPs are private.
With Minio started and serving files, I opened the console and created a bucket and key using clickops.
Since I can migrate S3 stuff around, replicate it, etc; I went with mostly defaults on the bucket.
Skipped encryption, replication, and locking for now.
The Access policy needs to be custom so it can operate as a CDN (read-only!time).
The bucket policy should be:
{
    "Version": "2012-10-17",
    "Statement": [
        {
            "Effect": "Allow",
            "Principal": {
                "AWS": [
                    "*"
                ]
            },
            "Action": [
                "s3:GetObject"
            ],
            "Resource": [
                "arn:aws:s3:::mastodon/*"
            ]
        }
    ]
}
Then create an Access Key and give it a policy that has read/write:
{
 "Version": "2012-10-17",
 "Statement": [
  {
   "Effect": "Allow",
   "Action": [
    "s3:ListBucket"
   ],
   "Resource": [
    "arn:aws:s3:::bfd-so"
   ]
  },
  {
   "Effect": "Allow",
   "Action": [
    "s3:PutObject",
    "s3:DeleteObject",
    "s3:GetObject"
   ],
   "Resource": [
    "arn:aws:s3:::bfd-so/*"
   ]
  }
 ]
}
After a day of this running, it’s at 70 megabytes of storage. I uploaded like 2 pictures so far, so it looks like a lot comes from other users’ content.
To use Mastodon, one must run Mastodon
Now that we have all the prerequisites handled, we need to start up the Mastodon services.
The docker-compose.yml in the repo is pretty good, just needed the build: . lines removed.
I left elasticsearch and tor disabled.
Make a folder somewhere near that Minio folder and create the following docker-compose.yml.
Also, go ahead and make the system storage directory mkdir -p public/system && sudo chown -R 991:991 public/system.
version: '3'
services:
  db:
    restart: always
    image: postgres:14-alpine
    shm_size: 256mb
    networks:
      - internal_network
    healthcheck:
      test: ['CMD', 'pg_isready', '-U', 'postgres']
    volumes:
      - ./postgres14:/var/lib/postgresql/data
    environment:
      - 'POSTGRES_HOST_AUTH_METHOD=trust'

  redis:
    restart: always
    image: redis:7-alpine
    networks:
      - internal_network
    healthcheck:
      test: ['CMD', 'redis-cli', 'ping']
    volumes:
      - ./redis:/data

  web:
    image: tootsuite/mastodon
    restart: always
    env_file: .env.production
    command: bash -c "rm -f /mastodon/tmp/pids/server.pid; bundle exec rails s -p 3000"
    networks:
      - external_network
      - internal_network
    healthcheck:
      # prettier-ignore
      test: ['CMD-SHELL', 'wget -q --spider --proxy=off localhost:3000/health || exit 1']
    ports:
      - '3000:3000'
    depends_on:
      - db
      - redis
    volumes:
      - ./public/system:/mastodon/public/system

  streaming:
    image: tootsuite/mastodon
    restart: always
    env_file: .env.production
    command: node ./streaming
    networks:
      - external_network
      - internal_network
    healthcheck:
      # prettier-ignore
      test: ['CMD-SHELL', 'wget -q --spider --proxy=off localhost:4000/api/v1/streaming/health || exit 1']
    ports:
      - '4000:4000'
    depends_on:
      - db
      - redis

  sidekiq:
    image: tootsuite/mastodon
    restart: always
    env_file: .env.production
    command: bundle exec sidekiq
    depends_on:
      - db
      - redis
    networks:
      - external_network
      - internal_network
    volumes:
      - ./public/system:/mastodon/public/system
    healthcheck:
      test: ['CMD-SHELL', "ps aux | grep '[s]idekiq\ 6' || false"]

networks:
  external_network:
  internal_network:
    internal: true
As you can see here, the guts of the configuration are all stored in the .env.production file.
Each time you do a docker compose up, it will read in the .env.production file and set a bunch of configurations.
This one has to be quite redacted.
To generate it, I ran the rake mastodon:setup command using docker compose and bundler exec:
docker compose run --rm web bundle exec rake mastodon:setup
Note if this doesn’t do what you want, you can generate the secrets using the same docker compose run --rm web bundle exec rake incantation with the target secret and mastodon:webpush:generate_vapid_key. I ran the docker compose run --rm web bundle exec rake secret twice, once each for SECRET_KEY_BASE and OTP_SECRET.
Answer a bunch of questions and I’ll spit this out at the end. Save it into a file named .env.production and store it alongside the docker-compose.yml file.
LOCAL_DOMAIN=mast.brownfield.dev
SINGLE_USER_MODE=false
SECRET_KEY_BASE=xxxxxxxxx
OTP_SECRET=xxxxxxxxxx
VAPID_PRIVATE_KEY=xxxxxxxx
VAPID_PUBLIC_KEY=xxxxxxxxxxxxxxxx
DB_HOST=db
DB_PORT=5432
DB_NAME=postgres
DB_USER=postgres
DB_PASS=xxxxxxxxxxxxxxxxx
REDIS_HOST=redis
REDIS_PORT=6379
REDIS_PASSWORD=
S3_ENABLED=true
S3_PROTOCOL=https
S3_ENDPOINT=https://mast.files.brownfield.dev:9000
S3_HOSTNAME=mast.files.brownfield.dev:9000
S3_BUCKET=mastodon
S3_ALIAS_HOST=files.mast.brownfield.dev/mastodon
AWS_ACCESS_KEY_ID=xxxxxxxxx
AWS_SECRET_ACCESS_KEY=xxxxxxxx
SMTP_SERVER=smtp.mail.me.com
SMTP_PORT=587
SMTP_AUTH_METHOD=plain
SMTP_OPENSSL_VERIFY_MODE=client_once
SMTP_FROM_ADDRESS=notifications@brownfield.dev
SMTP_LOGIN=mxxxxxr@icloud.com
SMTP_PASSWORD=xxxxxxxxxxxx
You’ll notice the S3_ALIAS_HOST has /mastodon at the end.
In AWS’s S3 offering, the DNS has a prefix for the bucket name.
In Minio, it’s added as the first path element.
If you don’t add the bucket name here, your uploaded images won’t display.
It also sends a helpful outbound email to you to ensure it’ll work when you start the system. I am using iCloud for this and it took a while to get it all organized. I ran my own SMTP server in the past and it’s just not worth it.
As an aside, did you know that putting a CNAME DNS record on a root domain prevents all TXT records from being used? Thank God for ALIAS records.
After you have it all configured and you want to get it going, run the command!
docker compose up
And then you see this?!
WARN: ActiveRecord::NoDatabaseError: FATAL:  database "mastodon_production" does not exist
[... giant scary stacktrace ...]
What are all these database errors?!
I don’t know if the mastodon:setup task failed. I didn’t look at the log very closely.
There’s a good chance it initialized a database without storage or something.
I saw a lot of postgres errors when I started up the services so I investigated and found out the database didn’t have any users.
To make a user, I started up the compose, exec into the db container, switch user to postgres, get into the database, and then run the command to create the user with the right permission.
$ docker compose up -d
$ docker exec -it mastodon-db-1 /bin/bash
bash-5.1# su postgres
/ $ psql
> CREATE USER mastodon CREATEDB;
> \q
At this point you should have a user that can do the ORM tasks on startup.
docker compose down
docker compose run --rm web bundle exec rake db:reset
docker compose up -d
So, you’d think, once you do that last docker compose up -d, you’ll be good to access it and see if it’s okay.
Wellllll… I got redirected to a secure https connection so I just charged forward with wiring up ingress.
K8s objects to expose Mastodon to the world
Needed to create endpoints, services, and ingress the same as we did for Minio. This time there are 2 ports exposed so they are each present in the endpoint and service and then each has its own path in the ingress.
apiVersion: v1
kind: Service
metadata:
  name: mastodon-stor1
  namespace: mastodon
spec:
  ports:
  - name: mastodon-web
    port: 80
    protocol: TCP
    targetPort: 3000
  - name: mastodon-stream
    port: 8040
    protocol: TCP
    targetPort: 4000
  clusterIP: None
  type: ClusterIP
---
apiVersion: v1
kind: Endpoints
metadata:
  name: mastodon-stor1
  namespace: mastodon
subsets:
- addresses:
  - ip: 10.92.2.6
  ports:
  - name: mastodon-web
    port: 3000
    protocol: TCP
  - name: mastodon-stream
    port: 4000
    protocol: TCP
Ingresses for the Rails service and the streaming service.
apiVersion: networking.k8s.io/v1
kind: Ingress
metadata:
  name: mastodon-stor1
  namespace: mastodon
  annotations:
    cert-manager.io/cluster-issuer: "external"
    acme.cert-manager.io/http01-edit-in-place: "true"
    nginx.ingress.kubernetes.io/proxy-body-size: 20m
    nginx.org/client-max-body-size: 20m
spec:
  ingressClassName: external
  rules:
  - host: mast.brownfield.dev
    http:
      paths:
      - backend:
          service:
            name: mastodon-stor1
            port:
              name: mastodon-web
        path: /
        pathType: Prefix
      - backend:
          service:
            name: mastodon-stor1
            port:
              name: mastodon-stream
        path: /api/v1/streaming
        pathType: Prefix
  tls:
  - hosts:
    - mast.brownfield.dev
    secretName: mastodon-tls-secret
This part was surprisingly not very surprising. The one change I made to it was to increase the file size allowed. The app seems to cap images at 2 megabytes but I haven’t tested videos or anything else yet. This helpful gist shows an 80 megabyte limit.
Congratulations! You’re running a scary lawless Mastodon deployment with no rules and no oversight!
Best plan is to login real quick and lock some stuff down.
Make your account
Email needs to already be working since it emails you a password.
You can probably rails c your way around it but I had email working so went through the normal channel.
After your account is created, run this command to make yourself a server admin.
docker-compose run --rm web bin/tootctl accounts modify mterhar --role admin
Then go into admin and set some rules, require users be approved, whatever other mechanisms you think are right.
Set up 2Factor. You’re an admin dammit. Act like one
Also, feel free to add me and tell me how it went. If you gave up and skipped to the end and want to gripe at my awful instructions, okay.
Update: redeployed on a new domain
Apologies
I skipped the parts where I setup Kubernetes, load balancers, nginx ingress, cert-manager, and likely dozens of other pieces of infrastructure that make my deployment easy.
If you don’t have any of these already setup, just start an nginx container and send all of your traffic through that.
That same helpful gist’s nginx config section should get you there.